[Background]
제가 생각했을 때 모바일앱을 출시할 때 가장 큰 고민거리 중 한 개가 아무리 앱을 발전시켜도 사용자가 앱 업데이트를 쉽게 안 해준다는 점이라고 생각한다. 그래서 강제 업데이트를 도입해서 사용자에게 강제로 새로운 버전을 다운로드하게 하지만 너무 많이 남발하게 되면 오히려 UX를 해칠 수 있다.
그래서 이런 문제들을 해결하기 위해서 요즘 회사들에서 서버 주도 UI (Server driven UI)을 도입해서 사용자가 앱을 업데이트하든 말든 서버에서 손쉽게 UI를 변경할 수 있게 하고 있는 추세다.
그래서 한번 어떻게 도입하는지 맛보기를 해보겠습니다. 회사마다 하는 방식이 다를 거기 때문에 어떻게 도입할 수 있는지 감을 잡는 용도로 보시길 바랍니다.
[버전]
okHttp: 4.11.0
retrofit: 2.9.0
compose: 1.5.4
Gson: 2.9.0
[적용 원리]
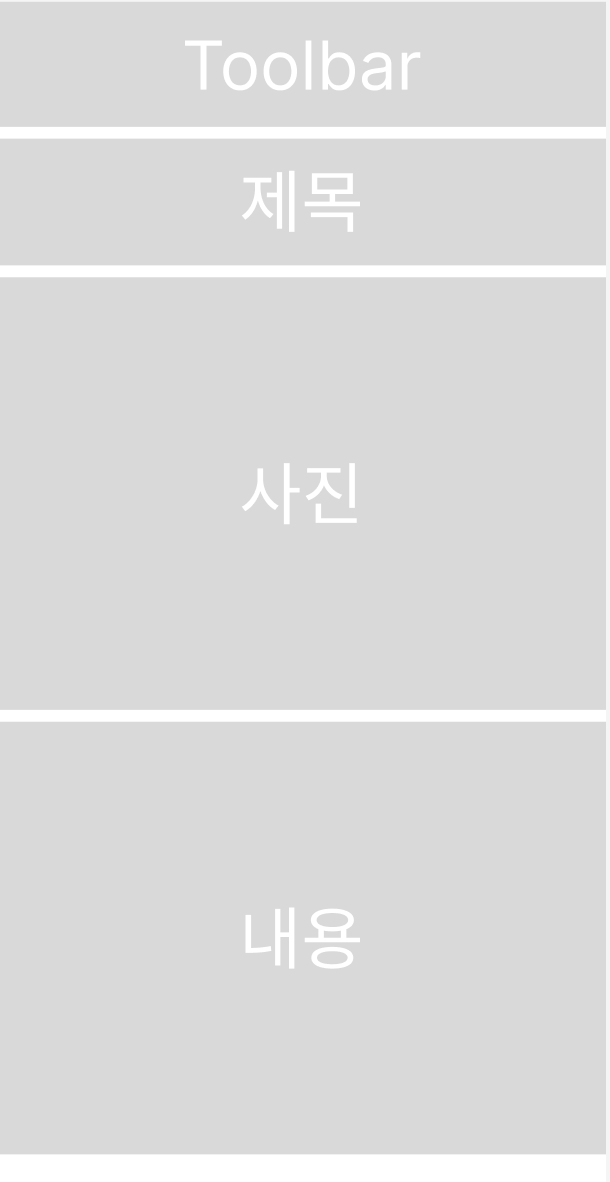
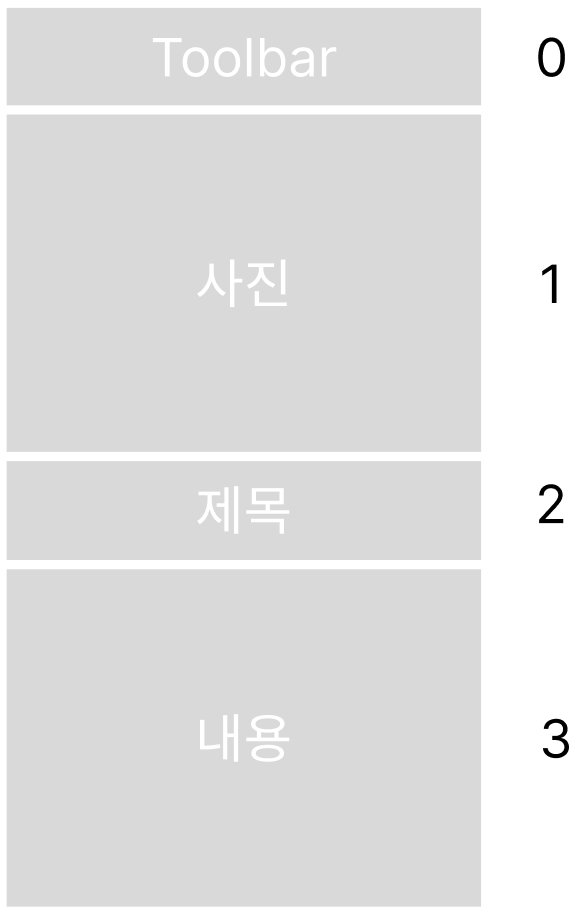
예를 들어 이런 화면이 있는데 제목과 사진의 위치가 마음에 들어서 서로 바꾸고 싶다면 개발자 입장에서는 그냥 코드 상에서 위치를 바뀌면 원하는 데로 바뀐다.


@Composable
fun DetailScreen() {
    Column {
        Appbar()
        Title()
        Image()
        Description()
    }
}@Composable
fun DetailScreen() {
Column {
Appbar()
Image() // 자리 변경
Title()
Description()
}
}
코드상에서는 쉽지만 이걸 배포 없이 사용자한테 바로 적용이 되어야 한다.
지금 UI를 보면 칸칸이 나눠져 있는데 서버에서 순서대로 어디 위치에 어떤 Composable이 들어갈지 알려주고 내려줄 때 사진과 제목의 위치를 바꾼 채로 내려주면 배포 없이 UI를 바꿀 수 있지 않을까라고 생각이 들 수도 있습니다.

한번 화면을 한 개의 Composable의 리스트라고 생각하고 1번 인덱스와 2번 인덱스를 바꿔서 내려주면 되지 않을까?
정말 간단히 설명했는데 이런 원리를 적용한 게 Server driven UI입니다.
서버 response를 보면 살짝 이런 식으로 Json이 구성이 되어야 합니다.
[
    {
        "id": 1,
        "name": "Appbar",
        "contents": {
           ...
        }
    },
    {
        "id": 2,
        "name": "Title",
        "contents": {
           ...
        }
    },
    {
        "id": 3,
        "name": "Image",
        "contents": {
           ...
        }
    }
    ...
 ]
각각 Section에 있는 name은 어떤 Composable이, 그리고 content는 이 Composable을 그릴 때 필요한 정보를 담아야 합니다. 예를 들어서 Appbar면 Appbar 제목, navigation Icon 그리고 클릭 시 액션 이런 걸 담고 있을 수 있습니다.
id 2번과 3번을 바꿔서 내려주기만 해도 사용자의 화면이 원하는 데로 바뀌게 됩니다.
그러면 RichText은 대체 뭐냐라고 할 수 있는데 Appbar의 제목을 내려줄 때 미리 그 제목이 어떤 사이즈, 어떤 색상이 적용될지 정의를 안 하고 이것도 서버의 응답으로 바꿀 수 있게 해 줍니다.
예를 들어서 이런 게 가능합니다.
여기는 한국입니다
여기는 한국입니다
서버 주도 UI와 RichText을 적용하면 사실상 UI이든 UI 안에 들어가 있는 텍스트의 스타일을 마음대로 바꿀 수 있게 해줍니다.
[설계]
제가 생각했을 때 서버 주도 UI에서 가장 중요한 건 어떻게 Json을 구성할지입니다. 백엔드와 프런트엔드가 서로 같은 형식과 이름을 사용해야지 정상적으로 파싱이 되고 저희 모바일 개발자가 설계한 대로 화면이 나오게 됩니다.
제가 설계한 Json 구조는 이와 같습니다.
[
    {
        "id": 1,
        "name": "HomeTitleViewType",
        "contents": {
            "tvHomeTitle": [
                {
                    "textRichType": {
                        "text": "원하는 상대의 ",
                        "size": 18
                    }
                },
                {
                    "textRichType": {
                        "text": "프로필",
                        "weight": 700,
                        "decoration": "underline",
                        "textColor": "#17a9a0",
                        "size": 24
                    }
                },
                {
                    "textRichType": {
                        "text": "을 찾아 ",
                        "size": 18
                    }
                },
                {
                    "textRichType": {
                        "text": "대화",
                        "weight": 700,
                        "background": "#FFEFE8",
                        "textColor": "#17a9a0",
                        "size": 24
                    }
                },
                {
                    "textRichType": {
                        "text": "해 보세요!",
                        "size": 18
                    }
                },
                {
                    "imageRichType": {
                        "url": "https://png.pngtree.com/png-vector/20191126/ourmid/pngtree-image-of-cute-radish-vector-or-color-illustration-png-image_2040180.jpg",
                        "width": 30,
                        "height": 30
                    }
                }
            ]
        }
    }
 ]
- id: Compose가 구분할 수 있기 위한 Unique key값
- name: 어떤 Composable이 그려질지를 정의
- tvHomeTitle: 이 key는 화면 그릴 정보를 담을 변수 이름, value는 화면을 그릴 정보들이다
- textRichType: RichText을 적용하기 위한 정보들이 담겨있다
- imageRichType: 글 사이에 이미지까지 넣을 수 있기 때문에 두 개를 구분해 두었다
이걸 화면으로 바꾸면 이렇게 보이게 된다

이제 설계는 끝났기 때문에 한번 코드에서 이걸 어떻게 받아올지 한번 보겠습니다.
[구현]
서버 응답은 이 사이트를 통해 내려주겠습니다.
https://www.mockable.io/
Secure and plain mocks HTTPS and HTTP HTTPS is de facto standard in nowadays applications and websites. Mockable provides both HTTPS and HTTP for your mock. Let's have a safer web!
www.mockable.io
이 리스트들을 받아올 때는 List <ViewTypeVO>로 받아오게 된다.
interface DrivenApiService {
    @GET("home")
    suspend fun getDrivenData(): Response<List<ViewTypeVO>>
}
내부는 이렇게 되어 있다.
data class ViewTypeVO(
    val id: Int,
    val viewType: ViewType,
    val content: ContentVO,
)
ViewType은 Enum으로 Json에서 넘겨주는 Composable 이름 바탕으로 어떤 데이터 클래스에 화면을 그릴 데이터를 담아야 할지 정할 수 있게 해 준다. findClassByItsName을 통해 알맞은 타입을 반환해 준다.
enum class ViewType(
    private val viewTypeClass: Type,
) {
    // 타입이 늘어날시 여기에 추가
    HomeTitleViewType(ContentVO.HomeTitleContent::class.java),
    UserInfoViewType(ContentVO.UserInfoTile::class.java),
    UnknownViewType(ContentVO.UnknownContent::class.java);


    companion object {
        fun findClassByItsName(viewTypeString: String?): ViewType {
            values().find { it.name == viewTypeString }?.let {
                return it
            } ?: return UnknownViewType
        }

        fun findViewTypeClassByItsName(viewTypeString: String?): Type {
            return findClassByItsName(viewTypeString).viewTypeClass
        }
    }
}
각각 화면의 정보를 담을 data class들이다, HomeTitle 하고 userInfo 두 개만 있는데 Composable 타입이 추가될수록 여기와 ViewType에 늘려주면 된다.
sealed class ContentVO {
    // 타입이 늘어날시 여기에도 추가
    data class HomeTitleContent(
        val tvHomeTitle: List<RichText>,
    ) : ContentVO()

    data class UserInfoTile(
        val tvProfileName: List<RichText>,
        val tvProfileIntro: List<RichText>,
        val ivProfileImg: ImageType,
    ) : ContentVO()

    object UnknownContent : ContentVO()
}

data class ImageType(
    val image: String,
    val width: Float,
    val height: Float,
)
마지막은 RichText에서 사용하게 될 정보를 담을 data class을 만들어준다. 텍스트 스타일을 더 수정하고 싶으면 여기에 추가하면 된다.
data class RichText(
    val textRichType: RichTextType?,
    val imageRichType: RichImageType?,
)

data class RichTextType(
    val text: String,
    val weight: Int?,
    val style: String?,
    val decoration: String?,
    val textColor: String?,
    val background: String?,
    val size: Float?,
)

data class RichImageType(
    val url: String,
    val width: Float?,
    val height: Float?,
)
방금 있던 화면의 정보를 담기 위해 알맞은 data class를 찾는 일은 retrofit에서 하게 되는데, 당연히 기본 retrofit으로는 안되고 직접 구분할 수 있도록 기준을 줘야 한다.
이건 JsonDeserializer을 직접 만들어주면 된다.
class ViewTypeDeserializer : JsonDeserializer<ViewTypeVO> {
    override fun deserialize(
        json: JsonElement?,
        typeOfT: Type?,
        context: JsonDeserializationContext?,
    ): ViewTypeVO {
        val jsonObject = json?.asJsonObject ?: throw IllegalArgumentException("Json Parsing 실패")
        val id = jsonObject["id"].asInt
        val viewTypeString = jsonObject["name"].asString
        val viewType: ViewType = findClassByItsName(viewTypeString)
        val content = jsonObject["contents"].asJsonObject
        val contentVO: Type = ViewType.findViewTypeClassByItsName(viewTypeString)
        val deserialize: ContentVO = Gson().fromJson(content, contentVO)
        return ViewTypeVO(id, viewType, deserialize)
    }
}
그리고 이 커스텀 deserializer을 retrofit 객체 만들 때 넘겨주면 된다.
fun provideDrivenRetrofit(okHttpClient: OkHttpClient): Retrofit =
    Retrofit.Builder()
        .baseUrl("http://demo3624522.mockable.io/")
        .client(okHttpClient)
        .addConverterFactory(
            GsonConverterFactory.create(
                GsonBuilder()
                    .registerTypeAdapter(ViewTypeVO::class.java, ViewTypeDeserializer())
                    .create()
            )
        )
        .addConverterFactory(GsonConverterFactory.create())
        .build()
이러면 retrofit이 알맞은 data class에 화면 정보를 담긴 걸 내려주게 된다.
이제 데이터를 우리들이 사용할 수 있는 방식으로 파싱을 했으니 이걸 활용해서 화면을 그려봅시다.
LazyColumn에 순서대로 Composable을 넣어주면 된다.
@Composable
fun HomeScreen(state: HomeState) {
    LazyColumn {
        items(state.drivenData.size, key = {
            state.drivenData[it].id
        }) {
            GetComposableType(viewType = state.drivenData[it])
        }
    }
}
다른 방식을 사용할 수 있지만 타입이 얼마 안 되니 When문을 이용해서 알맞은 Composable을 호출해 줍니다.
@Composable
fun GetComposableType(viewType: ViewTypeVO) {
    when (viewType.viewType) {
        ViewType.HomeTitleViewType -> {
            HomeTitle(data = viewType)
        }

        ViewType.UserInfoViewType -> {
            UserProfileCard(data = viewType)
        }

        else -> {
            // do nothing
        }
    }
}
그중에 HomeTitle을 보면 받아와서 캐스팅을 해준 다음에 parseRichText라고 하는 함수에 넣게 되는데요
이 함수는 서버에서 내려준 RichText의 정보를 String에 적용해 줍니다.
@Composable
fun HomeTitle(data: ViewTypeVO) {
    val content = data.content as ContentVO.HomeTitleContent
    val context = LocalContext.current
    val parsedContent by remember(key1 = data.id) {
        mutableStateOf(
            parseRichText(content.tvHomeTitle, context)
        )
    }

    Box(
        contentAlignment = Alignment.Center, modifier = Modifier
            .fillMaxWidth()
            .padding(16.dp)
    ) {
        Text(text = parsedContent.first, inlineContent = parsedContent.second)
    }
}
RichText을 적용하기 위해서 compose ui에서 제공하는 buildAnnotatedString이라는 함수를 이용해서 각각 RichText에 style을 적용해 준다.
Image 같은 경우에는 바로 String에 넣을 수 없고 Compose Text에서 가능해서 url을 키값으로 보고 Text한테 줄 map을 만들어준다.
fun parseRichText(
    richText: List<RichText>,
    context: Context
): Pair<AnnotatedString, Map<String, InlineTextContent>> {
    var inlineContent = mapOf<String, InlineTextContent>()

    val content = buildAnnotatedString {
        richText.forEach {
            if (it.textRichType != null) {
                val text = it.textRichType!!
                withStyle(text.applyTextStyle()) {
                    append(text.text)
                }
            } else {
                val image = it.imageRichType!!
                inlineContent = inlineContent + image.applyImageStyle(context)
                appendInlineContent(id = image.url)
            }
        }
    }

    return Pair(content, inlineContent)
}

fun RichTextType.applyTextStyle(): SpanStyle {
    return SpanStyle(
        color = parseColor(this.textColor),
        background = parseColor(this.background),
        fontSize = this.size?.sp ?: 0.sp,
        fontWeight = FontWeight(this.weight ?: 500),
        fontStyle = this.style?.let {
            FontStyle.Italic
        },
        textDecoration = when (this.decoration) {
            "underline" -> TextDecoration.Underline
            "line-through" -> TextDecoration.LineThrough
            else -> TextDecoration.None
        }
    )
}

fun RichImageType.applyImageStyle(context: Context): Map<String, InlineTextContent> {
    return mapOf(
        this.url to InlineTextContent(
            Placeholder(
                this.width?.sp ?: 0.sp,
                this.height?.sp ?: 0.sp,
                PlaceholderVerticalAlign.Center
            )
        ) {
            AsyncImage(
                model = ImageRequest.Builder(context).allowRgb565(true).data(this.url).build(),
                contentDescription = "image"
            )
        }
    )
}

private fun parseColor(color: String?): Color {
    return if (color.isNullOrEmpty()) {
        Color.Unspecified
    } else {
        Color(android.graphics.Color.parseColor(color))
    }
}
UserProfileCard도 HomeTitle와 마찬가지로 캐스팅, RichText을 적용하고 나면 사실상 평소에 UI를 만드는 방식하고 똑같이 만들면 된다.
[
    {
        "id": 1,
        "name": "HomeTitleViewType",
        "contents": {
           ...
        }
    },
    {
        "id": 2,
        "name": "UserInfoViewType",
        "contents": {
            "ivProfileImg": {
                "image": "https://img.icons8.com/?size=512&id=63684&format=png",
                "width": 40.0,
                "height": 40.0
            },
            "tvProfileName": [
                {
                    "textRichType": {
                        "text": "Louise",
                        "textColor": "#222624",
                        "weight": 700,
                        "size": 18
                    }
                }
            ],
            "tvProfileIntro": [
                {
                    "textRichType": {
                        "text": "nice to meet you! I’m from Fra..",
                        "textColor": "#6d6d6d",
                        "size": 16
                    }
                }
            ]
        }
    },
    {
        "id": 3,
        "name": "UserInfoViewType",
        "contents": {
            ...
        }
    },
    {
        "id": 4,
        "name": "UserInfoViewType",
        "contents": {
            ...
        }
    }
]
이 Json 형식대로 내려주면 서버에서 지정한 UI대로 잘 그려지는 걸 볼 수 있다.

사실상 여기서부터는 HomeTitle 만든 것처럼 Composable을 계속 늘려나가고 딱 GetComposableType, ContentVO, ViewType 이 세 곳에만 추가를 해주면 된다.
[마무리]
긴 글 읽어주셔서 감사합니다
전체 코드는 여기서 확인 가능합니다.
https://github.com/flash159483/mutli-module-compose
GitHub - flash159483/mutli-module-compose
Contribute to flash159483/mutli-module-compose development by creating an account on GitHub.
github.com
'android > compose' 카테고리의 다른 글
| [Android/Compose] 새로 추가된 Navigation3에 대해 알아보기 (2) | 2025.05.22 |
|---|---|
| [Android/Compose] 최소 터치 타겟 사이즈에 대해서 알아보기 (0) | 2024.01.14 |
| (Android/Compose) Paging 라이브러리 없이 Paging 적용해보기 (1) | 2023.12.08 |
